
Search the knowledge base, browse our resources, and visit our Community Forum for more detailed information
Last updated: 5 Jun 2026
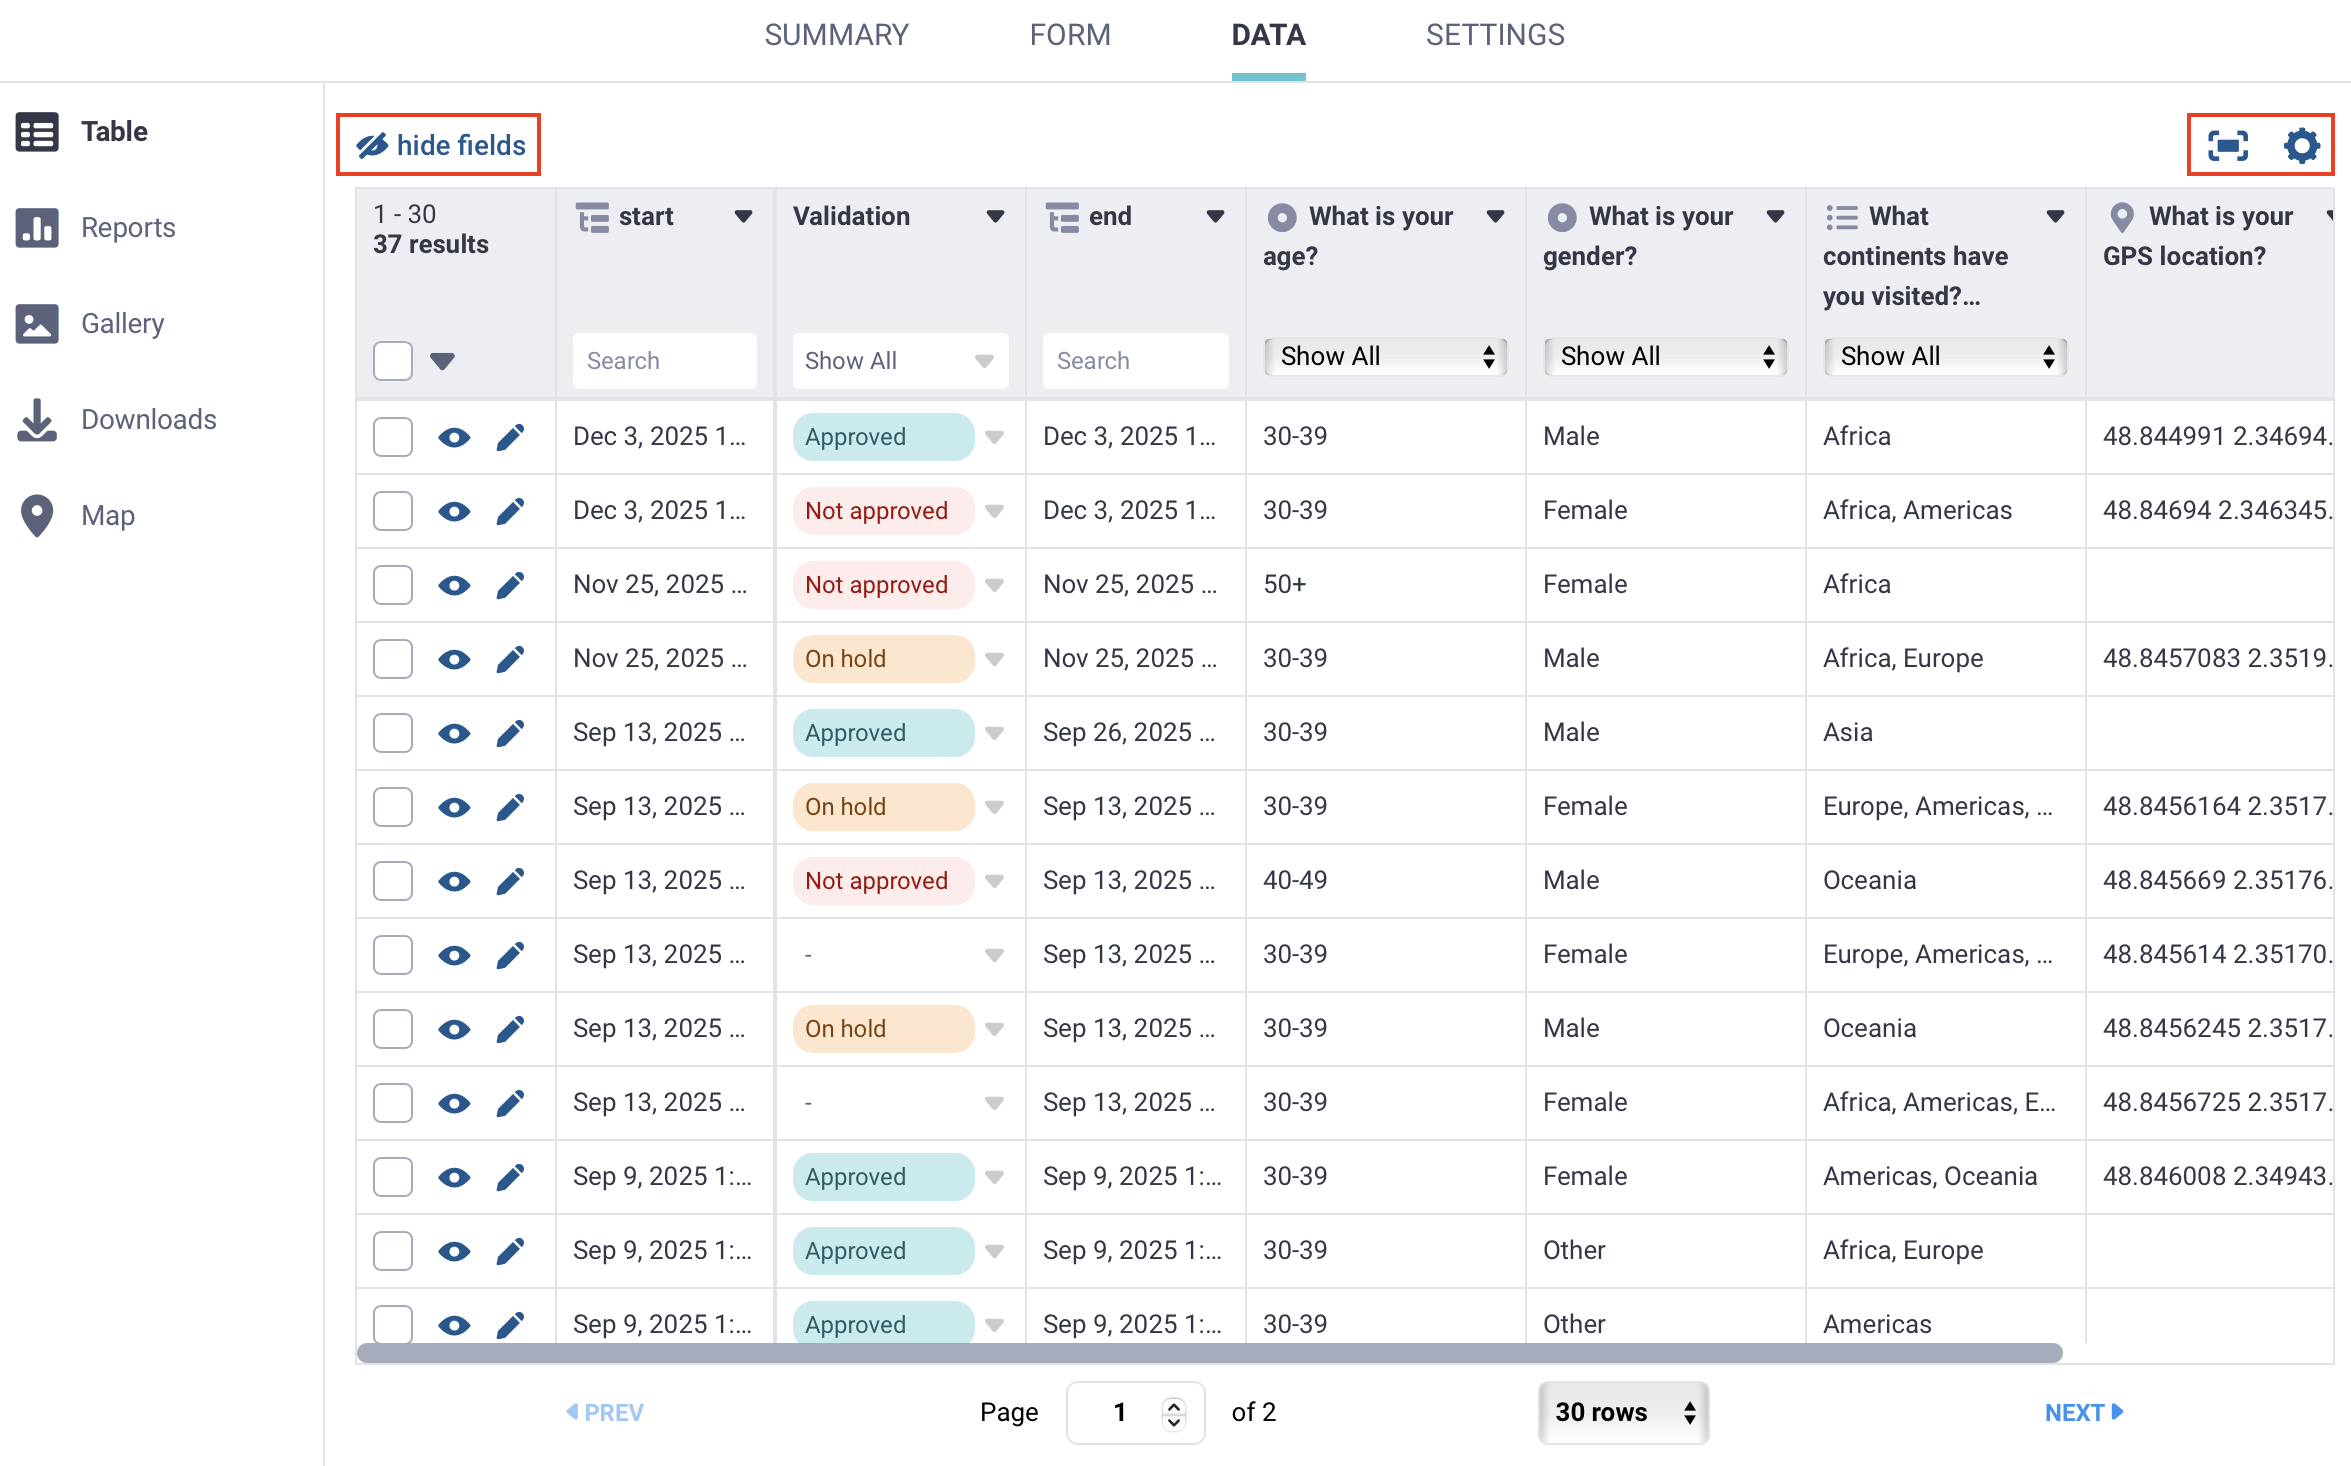
The Table view in the DATA section of your KoboToolbox project provides a complete and customizable overview of all project submissions. By default, all records are shown, with the most recent submissions listed first. This view is the primary workspace for exploring data, monitoring data quality, validating submissions, and making edits.
This article explains how to:
Configure the data table in the Table view
Filter and sort your data
View and validate submissions
To learn more about making changes to your data, see Editing and deleting your data.
Project owners can control data access by assigning separate permissions to view, edit, validate, and delete submissions. For example, they can allow some team members to view and validate data while restricting editing and deletion permissions.
To learn more about user-level permissions for viewing, validating, and editing data, see Sharing projects with user-level permissions.
The data table in the Table view displays all submissions and data fields by default. In many projects, a more focused view is needed. Adjusting what appears in the table helps you work more efficiently, especially for forms with many questions or nested groups. You can choose which fields to display and how data is shown to better match your workflow.
Above the data table, you can configure the following settings:
Hide fields: Click hide fields to view a list of all questions and fields in your form. All fields are selected by default. Clear the checkbox for any field you want to hide, then click Apply to save your changes.
Toggle fullscreen: Click Toggle fullscreen to expand the data table to fill the browser window.
Display options: Click Display options to control how labels, groups, and HXL tags are shown in the table. The following display options can be configured:
Display option |
Description |
|---|---|
Display labels or XML values? |
Choose whether to show XML values or full question and choice labels in any form language in your table. |
Show group names in table headers |
Decide whether column headers in the table include the name of the question group (e.g., |
Show HXL tags |
Display Humanitarian Exchange Language (HXL) tags if they were added to your form. |
Within the data table, you can click a column header and select Hide field to remove fields you do not need, or Freeze field to keep a frequently used field visible while you scroll.
Note: These settings affect the Table view for all project users.
Each submission in the data table includes system-generated fields that help identify records and track submission details. These fields appear as separate columns at the end of the table and cannot be edited.
Field |
Description |
|---|---|
|
A unique identifier for the version of the form used for the submission. This is useful if your form changed over time and you need to know which version collected the data. |
|
A server-generated ID number for the submission. It is assigned after the submission reaches KoboToolbox and is unique on that KoboToolbox server. |
|
An automatically generated identifier for the submission. It can help identify a record, but it may change if the submission is edited, so it is not the most reliable field for long-term tracking. |
|
The date and time the submission was received by the KoboToolbox server. In exports, this value is stored in UTC. In the data table, it is shown in the user’s timezone. |
|
The username of the person who submitted the data. This is always recorded for KoboCollect submissions, and is recorded for web form submissions only when authentication is required. |
|
A stable identifier for the submission within the project. It is taken from the submission’s original |
Note: These fields differ from user-enabled form metadata because they are automatically generated for each submission. You do not need to add them during form development.
By default, submissions in KoboToolbox appear in the data table in submission order, with the most recent entries at the top. In large projects, filtering and sorting are essential for exploring, reviewing, and cleaning data. They help you quickly find specific respondents, examine patterns, and identify records that need attention.
Note: The Table view in KoboToolbox provides basic filtering and sorting for data monitoring and editing. For more advanced data analysis, including filtering with multiple conditions, we recommend exporting your dataset and using spreadsheet or analysis software.
For each column in the data table, you can use the following features:
Search: Use the search bar above text, number, and date fields to filter results. For example, you can search for a unique ID or filter by a specific age.
Filter: For fields based on select type questions, click Show all in the column header to open a list of answer options. Select an option to filter the responses.
Sort: Click a column header and choose Sort A → Z or Sort Z → A to change the order of submissions.
Note: Sorting the table applies to all users and persists after you leave the Table view. Searching and filtering applies only to you while you are in the Table view and automatically resets when you leave it.
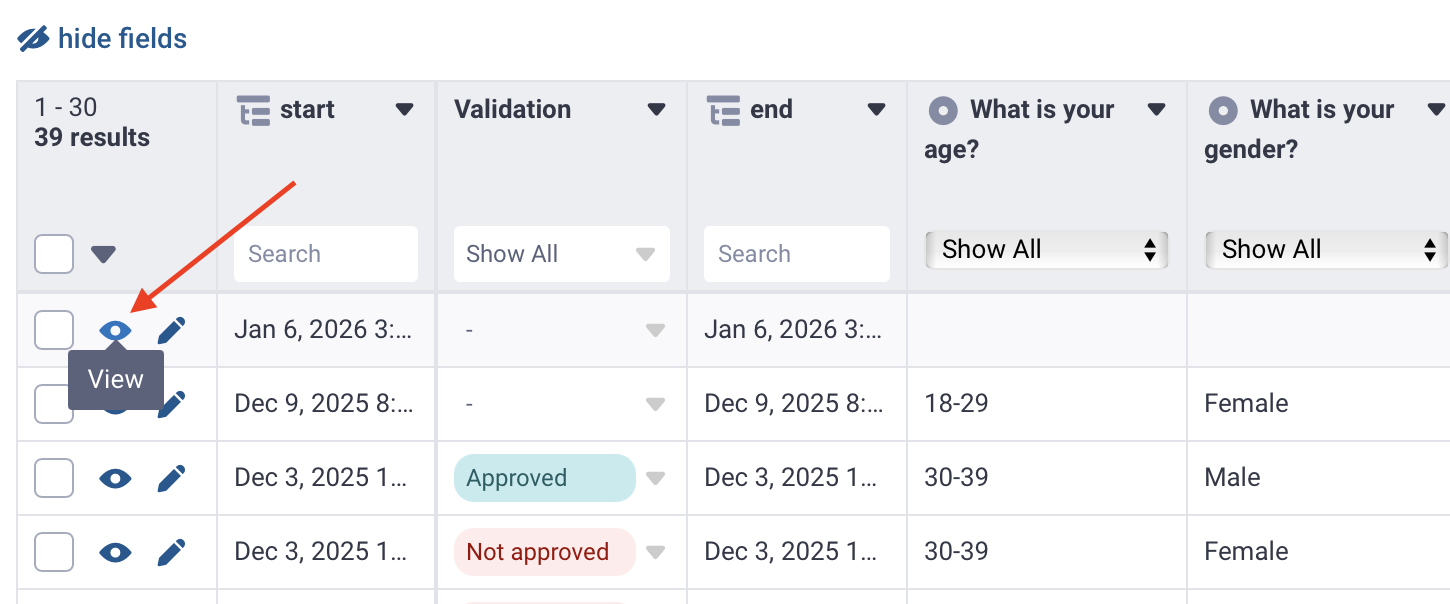
Opening an individual submission lets you review all data from a single respondent. The single submission view includes tools for examining and managing an individual record.
To open a submission, click View in the corresponding row.
The submission window displays all responses and includes the following options:
View data in any form language.
Display XML values next to each question.
View and Edit the submission as a web form.
Duplicate the submission.
Print the submission.
Delete the submission.
Assign a Validation status.

Within the single submission view, navigate through submissions using < Previous and Next >.
Record validation helps project teams maintain data quality, track review status, and flag issues that require follow-up. Validation status appears as a dedicated column in the Table view, and users with appropriate permissions can update them for individual or multiple submissions.
The available statuses are:
Approved: The submission has been reviewed and confirmed to be complete, accurate, and suitable for use in analysis.
Not approved: The submission does not meet data quality requirements and should be excluded from analysis or removed from the dataset.
On hold: The submission requires review. Additional verification or follow-up is needed before the data can be accepted or rejected.
Validation supports structured data review in collaborative teams. For example, reviewers can filter the table to show only submissions that require review.
Note: A project owner can grant Validate submissions permission to other users separately from the Edit submissions permission.
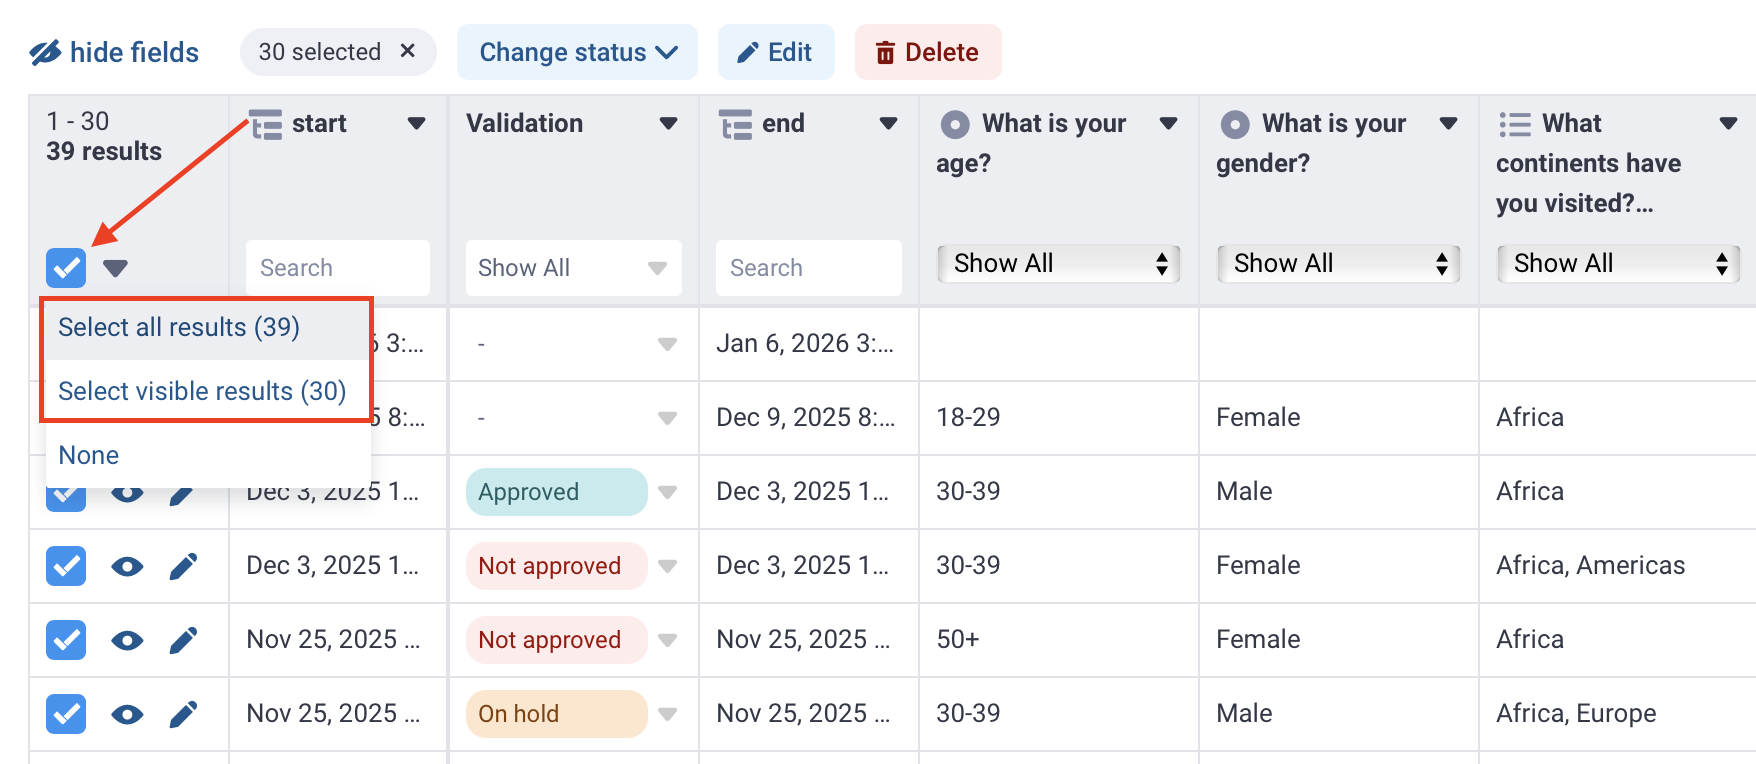
Validation status can be applied to multiple submissions at once, which is useful for large-scale reviews or quality checks.
To validate submissions in bulk:
Select the submissions using the checkboxes.
Click Change status.
Choose a validation status.
Note: You can select all submissions on the current page by clicking the checkbox in the table header. To select all submissions in the project across all pages, click the arrow next to the checkbox and choose Select all results.
_submitted_by field is filled only when a submission is linked to a KoboToolbox username. In KoboCollect, this field is always recorded. In web forms, it is recorded only when the project requires authentication. If the form allows submissions without a username and password, this field will be empty._submitted_by for web form submissions, go to FORM > Collect data and turn off “Allow submissions to this form without a username and password”.
Did you find what you were looking for? Was the information clear? Was anything missing?
Share your feedback to help us improve this article!